Google has released the latest version of it mobile OS i.e Android 2.3 Gingerbread. Here is a guide on how to run and try Android 2.3 Gingerbread on Windows. Follow all the instructions below to try the new version of Google Android on your PC.
2. Extract the file and run “SDK Setup.exe”?
3. If you receive an error message stating “Failed to fetch url…”? then you will have to force the Setup program. Follow the steps:
- Close the “Refresh Sources”? window.
- Cancel the “Choose Packages to Install”? window.
- Select “Settings”? from the left side of the “Android SDK and AVD Manager”? window.
- Check the box labeled “Force https://… sources to be fetched using http://…”?
- Click “Save and Apply”?
- Close and restart the SDK Setup
4. Choose the packages you want to install. Select only the packages you need.
- If you are only interested in trying out the Android 2.3 Emulator.
- Reject everything except “SDK Platform Android 2.3. API 9, revision 1″? by selecting each item then selecting the Reject option.
- If you plan to develop Android applications and Games, you may wish to Accept All.
- Click “Install Selected”?
5. Allow the selected packages to download and install then close the “Installing Archives”? window.
6. Create a new Android Virtual Device (AVD) by selecting “Virtual Devices”? from sidebar, now click on new.
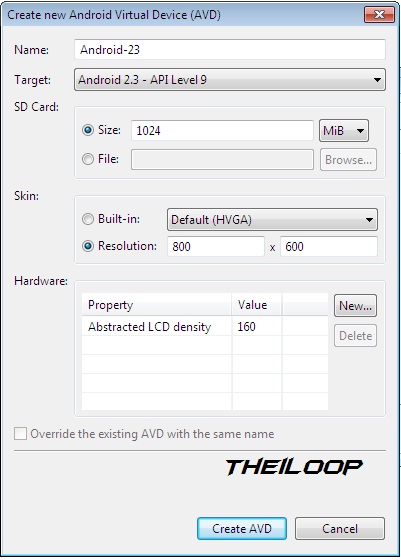
- Enter a Name
- Choose a Target (Android 2.3 – API Level 9)
- Enter a size for the emulated SD Card
- Choose a Skin or enter Resolution e.g 800×600
- Leave the default value of “Hardware”? or choose SD Card Support etc.
- Click “Create AVD”?
7. Start your newly created Virtual Device.
- Choose the Virtual Device from the list.
- Click “Start”?
- Click “Launch”? in the new window.
8. Now it will take some time to Boot.
9. Enjoy the Android OS 2.3 on your Windows, Mac or Linux.